Care & Feeding | Setup & Adjustments
Setup refers to the adjustment of the string height (action) from the frets to an optimal level. The strings need to be in an optimal distance from the frets; too low and the strings will touch the frets and buzz, too high and the instrument will be hard to play. Optimal setup is subjective from player to player. Some players who play with more intensity will require a higher setup, while some who wants to play fast may require a lower setup. Our instruments are given a median setup to accommodate both type of players.
Optimal setup is subjective from player to player. Some players who play with more intensity will require a higher setup, while some who wants to play fast may require a lower setup.
You can adjust your instrument to a specific setup that best suit your playing style. It will always be best to send your instrument to an experienced technician but it will also be good to understand the different parameters in setting up an instrument. Over at Maestro Guitars, we take note of three fundamental aspects of a setup; action, neck relief, and fret level.
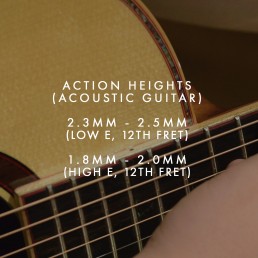
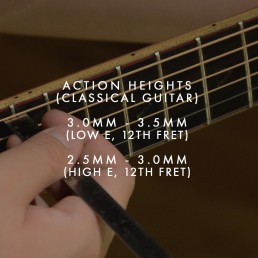
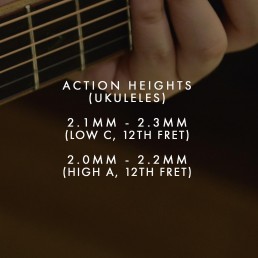
Action
Action refers to the distance of the strings from the frets. The action is determined by the height of the nut and saddle. If the nut is high, the distance between the string and the first few frets will be too high making the instrument harder to play. If the nut is too low, the distance between the string and the first few frets are too low and might cause some fret buzz. You can adjust the nut height by sanding the entire nut. Alternatively, you can adjust individual string action by filing the nut slot.
As for the saddle area, aside from the string action, another thing to consider is the break angle of the strings. Break angle refers to the degree of slope of the strings from the saddle to the bridge. The ideal break angle of the strings is around 45°. If the break angle is low, the lesser the string tension is which makes the string sound softer. If the break angle is high, the tension might be too strong that it may cause the top to deform due to the amount of pull of the strings. To get an ideal saddle height and break angle, you will need to consider the height of your bridge. If the bridge area is high due to bloating and it is irreversible, you might need to lower down the saddle but you might compromise the break angle. Alternatively, if the bridge is thick, you can shave it to achieve the optimal break angle and saddle height.
Neck Relief
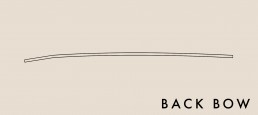
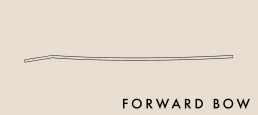
Neck relief refers to the amount of an optimal curve of the fingerboard to allow the string to oscillate freely without touching the frets. It is a common misconception that a neck should be dead straight. If the neck is too straight, there is a possibility that the strings will touch the frets beyond where it is fretted causing a buzzing sound. If the neck has a back bow, wherein the middle of the fingerboard is closer to the strings, there will definitely be a fret buzz. If the neck has too much forward bow, wherein the fingerboard is farther to the strings, the action will be too high especially on the middle of the fingerboard.
Neck relief can be adjusted in instruments equipped with truss rod by turning the truss rod. For our classical guitars and ukuleles, we integrated the relief to the fingerboard for they are not equipped with truss rod. After achieving an optimal nut and saddle height, you can adjust the neck relief of your instrument to achieve an optimal action across the fingerboard. The need to adjust the neck relief might be necessary from time to time. Do take note that though adding relief optimizes the action, turning the truss rod alone does not constitute a setup.
Adjusting the Neck Relief
Warning: Incorrect adjustment of the truss rod may result in irreversible damage to the instrument that in effect will require a costly neck repair. We do not ship our instruments with a truss rod adjustment tool to prevent damages caused by improper truss rod adjustment.
If you are experienced in this area and wish to adjust it on your own, you can purchase a truss rod adjustment tool at shop.maestroguitars.com. Alternatively, you can send your instrument for setup and truss rod adjustment to a Maestro Dealer / guitar technician near you.
- Make sure that the guitar is in tune.
- Place a capo on the first fret of the guitar. Alternatively, you can press one of the strings on the first fret.
- Press one of the strings on the 14th fret.
- Check the height of the string you are pressing on the 7th fret.
- If the string is touching the fret, some additional relief may be required. You can adjust the relief by loosening the truss rod, turn the truss rod to the left (anti-clockwise).
- If the string is too far from the fret, you can lessen the relief by tightening the truss rod, turn the truss rod to the right (clockwise).
- Ideally, the space between the string and the 7th fret while fretting the 1st and 14th fret is enough to insert in a thin piece of paper.
- If the instrument is still buzzing after adjusting to the prescribed relief, it will be best to send your instrument for a setup

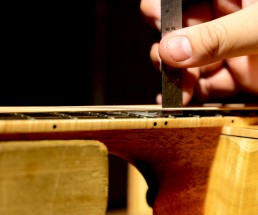
Fret Level
Aside from the action and neck relief, another thing you need to consider are the level of the frets. The frets height will change over time, either due to normal wear and tear or due to prolonged exposure to extreme humidity conditions.
The friction of the strings will cause to wear certain frets out in the long run making the fret heights uneven. Aside from normal wear and tear, exposure to extreme humidity condition may cause changes to the fingerboard. In effect, changes to fingerboard may alter the placement of the frets causing uneven frets.
Uneven frets hinders an instrument to achieve an optimal setup for you will be forced to compromise action and neck relief to accommodate an uneven fret. In the long run, especially if you frequently use your instrument, the need to re-fret your instrument may arise.
PLEK Setup
In our constant pursuit for immaculate playability, we incorporated the Plek setup process into our production line to ensure that every Custom Series and Private Collection not only sounds and looks good, but plays like a dream. Every Custom Series and Private Collection guitar from 2014 onwards has been put through this process, furthering our progress towards our goal of creating guitars that provide players with the tactile relationship with the instrument that makes it ever so intimate.
The Plek Station allows us to achieve a level of precision with setups never before possible with traditional methods. The Plek Station reads the condition of the frets and how level they are against the overall geometry of the fingerboard, and then shaves the fret wires down to a hundredth of a millimeter. This results in an instrument that not only plays better, but also sounds better due to the improved intonation and increased levels of harmonic content as the frets are much more finely cut.
